Forums
| ArchSociety :: Forum :: Design Process :: Jury, Presentation, Tools & Techniques |
|
« Previous topic | Next topic » |
| Tips: Corel Draw - AutoCAD - AI | ||
|
Moderator(s): Array, Array, Array, Array, Array, Array
|
| Author | Post | ||
| NEO |
|
||


 Registered Member #4
Joined: Thu Aug 04 2005, 04:54am
Registered Member #4
Joined: Thu Aug 04 2005, 04:54am: Dhaka Posts: 666 |
Integration of Corel - AutoCAD - AI etc: Often we fall in trouble with the integration of our commonly used softwares like AutoCAD with Corel, Corel with Adobe Illustrator etc. here I’m giving some easy integration tips: AutoCAD to Corel Draw: The most easy way to take AutoCAD drawings to Corel Draw as vector curves is to use the wmf format. Export your drawings from AutoCAD as WMF. Go to file, click on export 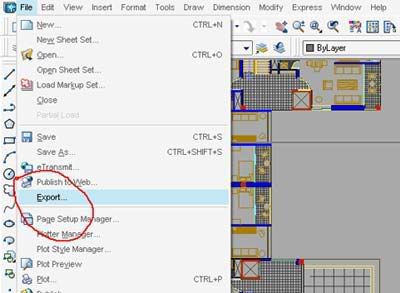 Define a folder to export the file and select the wmf (windows metafile) format in the dropdown box: 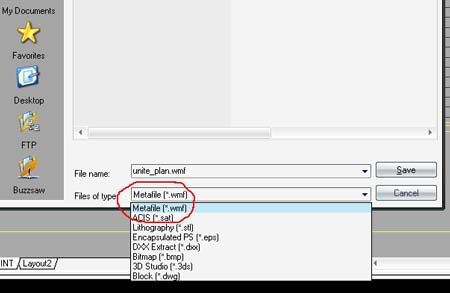 When you click on ‘save’ you will come to your model space in AutoCAD. Now select your desired are of your drawing to export it as wmf for using in other vector graphics softwares like Corel Draw. 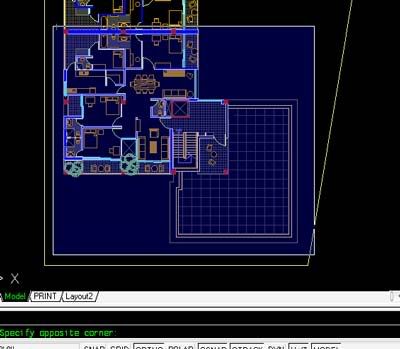 After selection press Enter or right-click. Your wmf file is now saved to the folder. Now open the Corel Draw file. Drag the wmf file from the folder and drop inside your drawing (you can do it using the ‘import’ command in corel also). Your AutoCAD drawing will now appear as vector curves in Corel Draw. To edit or render the drawing in Corel, just right click on the drawing and ‘ungroup’ it. 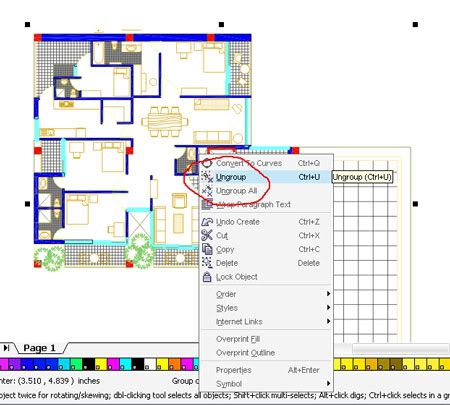 You are done. Now start rendering the drawing in Corel draw. You can change line thickness and color (press F12), you can also fill any area or use other effects as you desire. To keep the file size and memory usage in control of corel keep the imported drawing in a group after rendering(to group objects press ctrl+G). Another technique of using AutoCAD drawing in Corel is to save the AutoCAD drawing as ‘.dxf AutoCAD 2000’ format. You’ll get this option in ‘save as’. DXF drawings can be dragged and dropped or imported in Corel Draw directly. But you can’t select any specific area of the drawing during import export process. DXF will come with the entire model space drawing of the AutoCAD file into Corel, and often it may cause memory shortage and slow performance. Corel Draw to/from Adobe Illustrator The most useful technique to export Corel draw vector graphics to Illustrator is to using the EPS (encapsulated post script) format. Same for AI to Corel. Press ctrl+E in Corel to export your graphics. Select EPS in the dropdown box and export your graphics.  Now open AI, import the EPS file to Adobe Illustrator and use. More tutorials regarding this type of integration and print related issues are coming soon. Edited Thu Nov 23 2006, 10:49pm |
||
| Back to top |
|
||
| aliza |
|
||

 Registered Member #68
Joined: Thu Jul 06 2006, 06:28am
Registered Member #68
Joined: Thu Jul 06 2006, 06:28am: dhaka Posts: 162 |
thank u bhaia for the post..and waiting for the next tutorial.... | ||
| Back to top |
|
||
| dan |
|
||
 Registered Member #19
Joined: Sun Oct 23 2005, 06:37am
Registered Member #19
Joined: Sun Oct 23 2005, 06:37am: Dhaka-1217 Posts: 109 |
Wow dosto!! that's a real good job!! Atleast u know how necessary these tutorials are for me!!! (u already taught me thes techniques)so..also waiting for th next one!!thanks on behalf of every (...)like me!!! | ||
| Back to top |
|
||
| NEO |
|
||
|
Registered Member #4
Joined: Thu Aug 04 2005, 04:54am : Dhaka Posts: 666 |
Performance and file size optimization: AutoCAD Always keep your files backup using ‘save as’ option after making any important modification in drawing. While doing this erase all unnecessary drawings from your model space, just be sure that the previous ‘save as’ version has those scrap drawings. In this way you’ll lead towards a clean and clear model space with specific drawings. While ‘saving as’ don’t put a name like drawing-1 or final-2 etc. Always in every case try to write elaborate names of files. At least keep the name of the project in every file. After the name of the project give a number or specify the drawings name in the file. When you’ll lose your important drawings… and you’ll not be able to find them using ‘search’ then you’ll remember this advice!! When you are working in a workstation of a network always try to keep backups of your files in other computers or removable storages than your own local hard disk. You may run an automated backup task schedule to do this job automatically (try ‘Scheduled Task’ system in Windows or ‘Cron Jobs’ in Linux to do this). When your file is getting too heavy then you may turn off unnecessary layers. Specially when raster images are not in use, they should be taken to a single layer and that layer should be turned off. Another amazing helpful way to increase performance is, keep your units of drawings in a bit longer distance. Suppose keep the ground floor plan at a corner of your model space… then 1st floor plan a bit far from GF. The performance of AutoCAD is mainly dependent on “what it’s showing on the screen at a time” not very much on how big the entire drawing is. If you zoom in inside a rooms corner in detail.. cad will work smoothly, even if it is a huge file like the drawing of an entire city! But when you will zoom out to see the entire thing it will work slow. Same thing is applicable to the file size. Try this amazing thing…. Open one of your heavy drawings. Use Z-enter, E-enter command (zoom extent all), save a copy of the drawing using ‘save as’ at this entire zoomed situation. Now zoom in the drawing to a such place where nothing is visible, and save another copy of the drawing in this situation. Now see the deference! Check the file sizes of the zoomed in and zoomed out files. Yes the amazing thing is when we zoom in where nothing is visible and save, the file size of the same drawing becomes smaller!  Edited Sat Nov 25 2006, 06:00pm |
||
| Back to top |
|
||
| aliza |
|
||
|
Registered Member #68
Joined: Thu Jul 06 2006, 06:28am : dhaka Posts: 162 |
thanku again bhaia... | ||
| Back to top |
|
||
| NEO |
|
||
|
Registered Member #4
Joined: Thu Aug 04 2005, 04:54am : Dhaka Posts: 666 |
Performance and file size optimization Corel Draw ‘Corel makes big files’ this is a very common objection of every Corel users. Actually Corel makes big files only then when you use bigger images than your necessity. If you don’t use images in Corel, if you work with just vector graphics then you’ll see how small files are generated. Often we don’t want to use small sized or low resolution images scaring of low printing quality. But when we specifically know that an image which will be printed as 2”X4” in a composition then why to keep this image 4”X8”? So don’t do ‘dragging and resizing’ images anymore in Corel. Resize your images according to your needs before you start composing them in Corel. Such as if you are going to take prints in A4 size paper then you’ll never need any image more than 1024 pixels in width. So if you have any image bigger than this size at the beginning of your Corel composition you should resize it to 800 to 1024 pixels in width. You can easily do this in Photoshop or Picasa. If you need to drag and resize any image in Corel then we should use the ‘convert to bitmap’ option (after properly resizing, go to ‘Bitmaps’ and click on ‘convert to bitmap’ option), this will make the image just in that size what you have composed. After doing this practice see how low is your file size.. and how smoothly Corel is running! Complex vector graphics (suppose heavy drawings imported from AutoCAD or complex ‘mesh fill’) should be kept in a group unless you need to edit them. Keeping all the vectors in a group will reduce the memory usage of your machine. By default Corel can use maximum 25% of your RAM. You can easily increase this memory usage of Corel. Which will definitely increase the performance ( if you don’t use any other program at the same time with Corel). How to set the memory usage of Corel? >> Go to > Tools > option (or press Ctrl+J), a dialogue box will appear. At left pan you’ll get a tab named ‘memory’. Click on it. See the memory usage box, 25% maximum is set by default. Make it 50% to 60%. Now Corel will be able to use more RAM of your machine.. And when you are handling bigger files in Corel, this technique will really help you to work smoothly. |
||
| Back to top |
|
||
| etipuf |
|
||

 Registered Member #430
Joined: Sat Jan 06 2007, 09:30pm
Registered Member #430
Joined: Sat Jan 06 2007, 09:30pm: istanbul Posts: 101 |
corel draw opens dwg files along with dxf files as neo mentioned, but also as he mentioned, it is tough on the hardware since you cant just pick the parts you want- what i do for that is just do the picking in corel draw and delete all other objects my question about the wmf is i dont use it as often because i seem to lose scale with that. maybe i didn't notice that the images get exported with scale since i didn't use it but well, what i do is i plot the autocad drawings as pdf files. this really works well for me because both corel draw and photoshop recognize the pdf format, i get a transparent background and if you open the pdf in corel draw, right click and say "ungroup" you get your objects as vectors. just as good as wmf, and you can choose what scale you want, and you can work back and forth with photoshop. another tip, say i have enclosed objects in autocad in different layers, i plot each layer into a pdf seperately and juxtapose them in photoshop so i have a layered psd drawing, then do my hatching in photoshop. ps patterns look waaaay better than autocad hatches, and say i have each function in a different layer, i can use the replace color function to change the colors all together.would have had to choose each hatch and change it in autocad. |
||
| Back to top |
|
||
| NEO |
|
||
|
Registered Member #4
Joined: Thu Aug 04 2005, 04:54am : Dhaka Posts: 666 |
Wow nice tips. Hmm the scalling often becomes a big problem. I'll try PDF next time. Thanks Etipuf. |
||
| Back to top |
|
||

Powered by e107 Forum System

ArchSociety is licensed under a
Creative Commons Attribution-Noncommercial-No Derivative 3.0 License | Privacy Policy | About Us